Casting is a very common swing flaw among the amateur golfer in fact, more than 56% of golfers cast the golf club. Casting is defined as an early release of the wrist set or “lag” during the downswing. Casting leads to loss of power, lack of consistency and excessive ball spin.
Casting is caused by a few different reasons, most are not so obvious. We will begin by listing the reasons in their order of appearance:

- Lack of hip mobility
- Lack of lower body strength
- Lack of body separation
- Lack of core strength and stability
- Poor wrist mobility
A lack of hip mobility, lack of lower body strength, lack of body separation and a weak core causes the body to have poor stability and a lack of power. The upper body becomes too dominant in the downswing and tries to find ways to create power, causing the golfer to unhinge the wrist early and cast the club.
Poor wrist mobility or wrist weakness prevents the club from setting properly in the backswing and then during the downswing, holding the set to create crisp contact, a solid strike and a clean release of the club.
We can begin to correct the problems by addressing the physical issues that plague the body. We first need to rid the body of restrictions such as knots or adhesions within the muscles by using the foam roller. Secondly, we lengthen out the tight muscles by using static stretching techniques. Lastly, we systematically strengthen the tight/weak muscles individually to bring them back to normal function.
CASTING: Muscles to be rolled
Step 1, we start off by breaking up adhesions or tightness in the identified muscles below by using a foam roller to massage the area. You will know when you have found adhesions from the discomfort in the area that is being rolled. Try to roll on the adhesion anywhere from 30 to 90 seconds or until the discomfort subsides by 50% this will begin to work them out. Use a slow and steady pace to foam roll back and forth on these muscles first.

Piriformis-Place the roller under 1 side of the gluteus and then cross that leg over the other leg. Bend the opposite knee to help expose the piriformis to the roller and locate trigger points.

Latissimus Dorsi/Teres Major-Place the roller under one side of the body below the arm pit. Roll back and forth to try to locate trigger points.
.

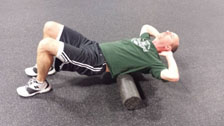
Tensor Fasciae Latae-Lie on your side with the roller under 1 hip just below the crest of the pelvis. Try to roll as far as you can down toward the knee to locate trigger points in the IT BAND also.

Upper Thorax-Place the roller under the scapula and roll back and forth as well moving the arms up, out to the side, above the head and behind the neck to try to locate trigger points.

Superficial Hip Flexor-Place the roller just below the crest of the pelvis and roll down toward the upper thigh trying to locate trigger points. If the tightness persists you can use a tennis ball or lacrosse ball to roll the area.
Lower Thorax-Place the roller under the mid-back and roll back and forth trying to locate trigger points.
CASTING: Muscles to be stretched
Step 2, would be to lengthen or stretch the muscles that we rolled. Each stretch should be held right at the point of discomfort in a static position for 30 to 60 seconds, try not to bounce because it can cause muscle fiber damage to the area.

Piriformis- Lie on your back and draw 1 knee toward the opposite shoulder in a diagonal manner then hold for 30-60 seconds

Tensor Fascia Latae- Lie on your back and turn 1 leg until it is dissecting your body in half then hold for 30-60 seconds

Wrist Flexors- Turn your palm face up and pull your fingers and palm back into an extended position. While holding hand, raise the arm upward until parallel with the floor and hold 30-60 seconds

Hip Flexors- Get your body into a split stance, thrust your pelvis forward until you feel the tightness in the back hip then bend your back knee until it almost touches the floor and hold for 30-60 seconds

Latissimus Dorsi-Kneel and place both hands on a ball. Lean your body forward onto the ball and feel the stretch in the side and the middle of the back. Hold for 30-60 seconds

Wrist Extensor- Turn your palm face down and pull your fingers and palm down into a flexed position. While holding hand, raise the arm upward until parallel with the floor and hold 30-60 seconds
CASTING: Muscles to be strengthened
Step 3, is to reactivate the underactive muscles to help restore normal muscular function, increase strength and decrease restrictions during the golf swing. To strengthen these area we use isolated strengthening exercises and positional isometrics. Try to complete 15 repetitions per side with a slow controlled pace, we are trying to gain strength and stability while creating separation between the upper body and lower body. This regimen should be repeated 2-3 days per week on nonconsecutive days for 3 weeks.

DISSASSOCIATION PLANKS: Dissassociation planks are great to build core strength and stability.
Execution: Start in a pushup position with your hands close together. Draw in your belly button to activate your core then raise 1 arm straight out to the side until parallel to the floor. Return your arm to the starting position and then immediately, in an explosive manner drive the opposite knee up to your chest on the side where you raised the arm. Continue to alternate left side, right side for a 60 second time frame. Complete 2 sets.

PRONE COBRA: Prone Cobra is used to create extension in the thoracic spine and put the golfer into the best position to rotate efficiently.
Execution: Lie face down on the floor with your arms close at your side and your palms facing up. Try to draw in the belly button and then bridge the chest off of the floor. During the chest bridge, try to raise the arms off the floor and turn the palms until they face the floor. Complete 2 sets and 15 repetitions holding each one for 1 second count at the top.

LYING OPEN BOOKS: Lying open books are used to create rotation and mobility in the thoracic spine as well as separation between the thoracic and the lumbar spine.
Execution: Lie down on your side with both of your knees drawn up into a fetal position. Use the arm on the side that you are lying on to grab both of your knees for stability. Use the hand of your free arm to grab your shirt buttons and pull your thorax back and try to lie your back flat on the floor. Complete 2 sets and 15 repetitions holding each one for 1 second.

SUPINE STABILITY BALL ROTATIONS: Supine stability ball rotations are used to create rotation and mobility in the lumbar spine as well as separation between the lumbar and the thoracic spine.
Execution: Lie flat on your back with your knees bent and your feet elevated upon a stability ball. Place your arms out to the side in a letter T position with your palms facing down. Press your heels into the ball and allow your feet, knees. Lower back and stability ball rotate as far to one side as it can. Be sure not to allow the opposite shoulder to raise up from the ground. Complete 2 sets and 15 repetitions doing 1 side at a time.
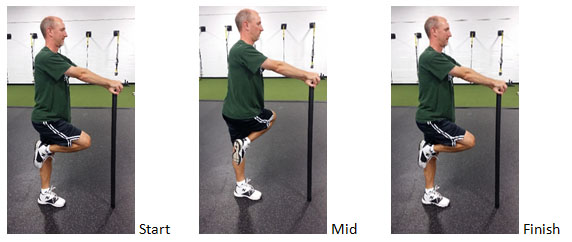
SUPPORTED STORK TURNS: Stork turns are a great way to increase hip mobility especially internal rotation such as the lead hip performs in a downswing and the trail hip performs in the loading of the backswing.
Execution: Stand in an upright position supported by a bar. Draw in your belly button to activate your core then bend one knee and place the foot next to the knee of the supported leg. While maintaining a good posture try to disassociate the supported leg from the upper body while turning into that hip. Complete 2 sets and 15 repetitions per side and hold each rep for 1 second.
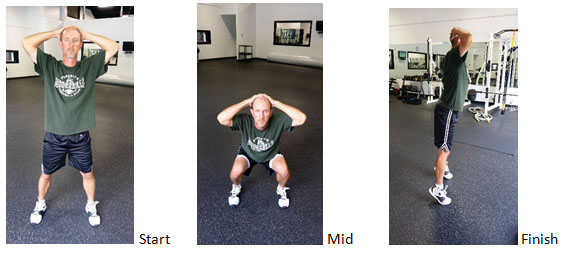
PRISONER SQUATS: Prisoner squats are great to strengthen the thighs and calves, create flexibility in the Thoracolumbar fascia as well as create a feeling of full extension in the pelvis such as at the MOI during the golf swing.
Execution: Start in a standing position with your feet shoulders width apart, place both hands places behind your head. Take a deep breath and make a full squat while keeping good posture. When you reach the bottom of your squat, exhale and return to standing and finish up onto the toes while trying to drive your pelvis up and forward for a full hip extension. Complete 2 sets and 15 repetitions and hold each one at the top position for 1 second.
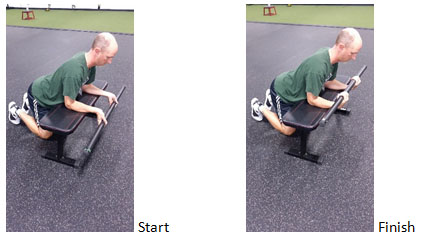
BARBELL WRIST CURLS: Barbell wrist curls are a great way to create good extension in the wrist as well as strength in the upper inner forearms.
Execution: Kneel down and place your forearms flat across a bench with your elbows bent and the palms facing up. Place a light barbell in the fingers and let the fingers and bar stretch down as far out as you can. Hold that position for 1 second then curl the wrist upward to a full flexed position and hold that position for 1 second. Complete 2 sets and 15-20 repetitions with a slow pace and look to create a burn in the forearm muscles.

REVERSE WRIST CURLS: Reverse wrist curls are a great way to create good wrist flexion as well as strength in the upper and outer forearm.
Execution: Kneel down and place your forearms flat across a bench with your elbows bent and the palms facing down. Place a light barbell in the fingers and let the wrist bend as far as you can. Hold that position for 1 second then extend the wrist upward to a fully extended position and hold that position for 1 second. Complete 2 sets and 15-20 repetitions with a slow pace and look to create a burn in the forearm muscles.
These first 3 steps of the Corrective Exercise Continuum will be key elements in returning your body to proper function as well as a functional and effective golf swing.
For any additional questions or comments please feel free to contact me via email at James@Coregolfperformance.com